How to Enable X11 Forwarding on Amazon Linux

X11 Forwarding can be configured on Amazon Linux instance created from AMI version 2017.09.01 with following steps. These may work with recent version of Amazon Machine Images (AMIs).
Step 1: Verify or install required X11 packages
Step 1: Verify or install required X11 packages
$ sudo yum list installed '*X11*'

Installed Packages
libX11.x86_64
libX11-common.x86_64
xorg-x11-font-utils.x86_64
xorg-x11-fonts-Type1.noarch
It would be required to install package xorg-x11-xauth.x86_64 which can be installed with following command.
$ sudo yum install xorg-x11-xauth.x86_64 -yOnce installed exit and reconnect SSH session. You may notice following information upon reconnecting.
/usr/bin/xauth: creating new authority file /home/ec2-user/.XauthorityDisplay can now be forwarded to an X11 Client from Amazon Linux.
Additional step are for configuring PuTTY with Xming client on Windows.
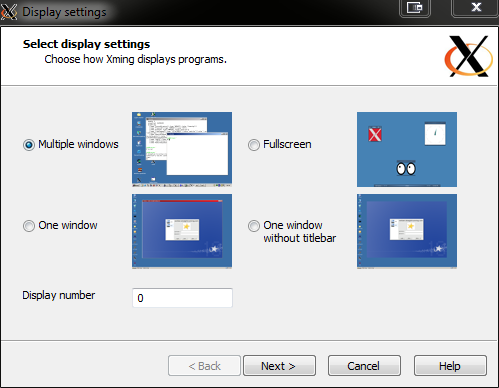
Step 2: Install Xming Client for Windows
Install Xming program for Windows that can be downloaded from Xming Site or searching on the internet.
Once installed, make sure server is started after the installation that can normally be seen in Taskbar notification area as Xming Server:0.0
Xming display settings are configured as following.
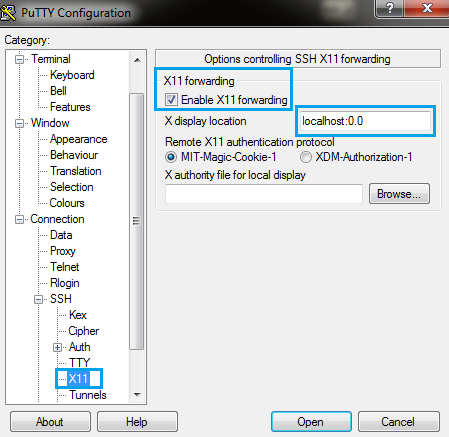
Step 3: Configure PuTTY to enable X11 forwarding
PuTTY can be utilized to connect to Amazon Linux from Windows environment. PuTTY’s SSH session can be configured to enable X11 forwarding as shown in the following image.
Now once connected to the Amazon Linux instance utilizing SSH protocol through PuTTY, display would be forwarded to the local Windows machine.